For è pass 2 days. I rode my bike n felt the biting point came nearer when clutched in.
This morning , it shifted nearer. Ytd, I had suspected a leakage somewhere n wanted to bring it to my mech today during lunch time, but the biting point was almost gone and i had to ride to my bike shop in the morning be4 work fearing that The clutch wont work anymore......
Mech called n told me the rubber seal below is gone.
Showing posts with label Touching up on the falcon. Show all posts
Showing posts with label Touching up on the falcon. Show all posts
Tuesday, November 4, 2008

Saturday, October 11, 2008
FA188HH For KL Trip....
With new tyres comes with new Pads.... Old one has worn out pretty much, its safer to put in some new ones and let them bed in before the trip.....

Nurse glove, for tending wounds and preventing ur hands getting dirty...

Nurse glove, for tending wounds and preventing ur hands getting dirty...
Thursday, October 9, 2008
More servicing, getting to "ABUSA" mode.
HKL @ Alxendra 081008
Michelin Pilot Power 2CT $430
Wheel Balancing Free
Tyre Gauge Free
HKL RainCoat Free
Planet @ UBI 091009
Tighten Chassis via slider Free
Rear Wheel Sprocket bearings 1 set + labour $45
Mileage : 123,657km
All for the KL long distance trip.
YTD morning, went to HKL early in the morning to get my tyres replaced, The rear can last for another 2k but since I'm going up to KL and now its raining season, replacing the tyre will be a safer choice. The other reason is Jean will be following me so safety comes first.
Ah san replaced for me both rear anf front, balancing not done for rear coz he suspect wheel bearing is slightly worn, but he doesnt have the japan bearing that I wanted, so bo bian loh. Called Raymond if he want my used tyre for Eddie, left it there for him to collect.

Front still good, but change anyway since different compound from different brand

Rear, rode for 12k ++ and decided to change since its been abused in a few long distance....

New 2CT, end 07 for rear and early 08 for front. 120/190 55
Opps slightly higher feel.
Went to planet this morning to get my bearing changed since the ah lao say he can find me KOYO. I give up on him because I hunted a few places but just couldn't find KOYO. All others had were NIS...... typical china brand..... Well, $45 for a quick fix compared to stock $75 excluding labour.... the ah lao also tighten the chassis screw and that totally solve the loosen parts sound when ever i go thru bumpy surface.... "live safer man!"

Koyo... and the used....
Michelin Pilot Power 2CT $430
Wheel Balancing Free
Tyre Gauge Free
HKL RainCoat Free
Planet @ UBI 091009
Tighten Chassis via slider Free
Rear Wheel Sprocket bearings 1 set + labour $45
Mileage : 123,657km
All for the KL long distance trip.
YTD morning, went to HKL early in the morning to get my tyres replaced, The rear can last for another 2k but since I'm going up to KL and now its raining season, replacing the tyre will be a safer choice. The other reason is Jean will be following me so safety comes first.
Ah san replaced for me both rear anf front, balancing not done for rear coz he suspect wheel bearing is slightly worn, but he doesnt have the japan bearing that I wanted, so bo bian loh. Called Raymond if he want my used tyre for Eddie, left it there for him to collect.

Front still good, but change anyway since different compound from different brand

Rear, rode for 12k ++ and decided to change since its been abused in a few long distance....

New 2CT, end 07 for rear and early 08 for front. 120/190 55
Opps slightly higher feel.
Went to planet this morning to get my bearing changed since the ah lao say he can find me KOYO. I give up on him because I hunted a few places but just couldn't find KOYO. All others had were NIS...... typical china brand..... Well, $45 for a quick fix compared to stock $75 excluding labour.... the ah lao also tighten the chassis screw and that totally solve the loosen parts sound when ever i go thru bumpy surface.... "live safer man!"

Koyo... and the used....
Wednesday, October 8, 2008
Pre MOTO Gp trip servicing..... Late Sept 08
MotorFactor @ Ubi
Valve Clearance $280
All Shim Replacement FREE
Timing chain tensioner replacement n Adjustment $130
Engine Oil OWS 5w-60 X3 $72.00
Cam cover oil rig set $38
Lower Linkage Bearings $195
NGK IRIDIUM CR9EIX 3SET from LAB $48
Mileage : 123,603
Pushed my bike to Alex on 29 Sept and collected on 4 oct, 1 day before my wedding. This is a must-do servicing for my babe as she was physically abused during the few trips to long distance places especially twice up to Hatyai. Almost hitting 24K since the last tappet clearace
I told Alex I wan all the all the shims and my tensioner replaced and he couldn't agree more to it. He introduced me some new EO, I decided to give it a try since he say it was good for long distant.
Went back to collect my bike ok Wed monring and was told that he suspect the linkage bearing is wearing off. Let it there for him to replace the bearing and finally collect it back on Sat morning.....
Valve Clearance $280
All Shim Replacement FREE
Timing chain tensioner replacement n Adjustment $130
Engine Oil OWS 5w-60 X3 $72.00
Cam cover oil rig set $38
Lower Linkage Bearings $195
NGK IRIDIUM CR9EIX 3SET from LAB $48
Mileage : 123,603
Pushed my bike to Alex on 29 Sept and collected on 4 oct, 1 day before my wedding. This is a must-do servicing for my babe as she was physically abused during the few trips to long distance places especially twice up to Hatyai. Almost hitting 24K since the last tappet clearace
I told Alex I wan all the all the shims and my tensioner replaced and he couldn't agree more to it. He introduced me some new EO, I decided to give it a try since he say it was good for long distant.
Went back to collect my bike ok Wed monring and was told that he suspect the linkage bearing is wearing off. Let it there for him to replace the bearing and finally collect it back on Sat morning.....
Thursday, September 25, 2008
More action please.....
Finally decided to join my buddies up to KL and MOTO GP 08. I was thinking after hatyai in july, I'ts been rather quiet for me and my babe, babe's not exercising much, muscles getting soft. So to get her ready for some action, she needs to be conditioned.....
123,603

Tappet clearance.....
123,603

Tappet clearance.....
Thursday, September 18, 2008
Should I go with my buddies or not .... end oct
Since hatyai, its been some lonely pump and go trips, didn't even touch kulai or perlin. Just pump, maybe some coffee at GP R&R and go home..... toooooo bored, tooooo short.......
Should I fork out $1k to service my bike and join my buddies this end oct???
Should I fork out $1k to service my bike and join my buddies this end oct???
Saturday, September 13, 2008
Peeling off...
Yap, The license sticker is peeling off by itself..... and Mr Man in White will slap me $70 if he catch up with me on this....
Luckily I had replacement readily made but it wont be on the same place.....

There, u will go.....

& That's where you'll stay!
Luckily I had replacement readily made but it wont be on the same place.....

There, u will go.....

& That's where you'll stay!
Friday, August 22, 2008
Chain getting noisy.....Opps... yellow bottle dry...
It was getting noisy whenever i push my bike out of the bike lot. Then today is my last paper and had enough confident to studying anymore, I brought my tools down to service my chain and notice my scottoiler bottle was empty......
Did a good cleaning on the chain, sprocket and rims, then filled up the scottoiler bottle and notice the oil wasn't dripping. So poke poke abit hopping to clear some choke at the drip opening and at the same time notice air gaps in the drip tube. Well i guess it will take some riding to fill up the gaps......
I guess its almost 3 months since i last touch babe....
Did a good cleaning on the chain, sprocket and rims, then filled up the scottoiler bottle and notice the oil wasn't dripping. So poke poke abit hopping to clear some choke at the drip opening and at the same time notice air gaps in the drip tube. Well i guess it will take some riding to fill up the gaps......
I guess its almost 3 months since i last touch babe....
Tuesday, August 5, 2008
Going overdue.....
Going thru' a super busy time right now.
Not only tired from shifting house, setting up my new house, spending lotsa $$$ on furniture and reno. I'm super dried up, not to mention squeezing dry from the bike week.
My stuff are slowing going to due and some r getting over due.
Tyres are slowly worning, engine getting nosier, hinting me to push my bike into the workshop. Brake pads seems to reach its limit and not to mention I could count the layers of dust on the surface.......
Please bear with me a while longer and I'll promise to bring u back to a shine!
Not only tired from shifting house, setting up my new house, spending lotsa $$$ on furniture and reno. I'm super dried up, not to mention squeezing dry from the bike week.
My stuff are slowing going to due and some r getting over due.
Tyres are slowly worning, engine getting nosier, hinting me to push my bike into the workshop. Brake pads seems to reach its limit and not to mention I could count the layers of dust on the surface.......
Please bear with me a while longer and I'll promise to bring u back to a shine!
Monday, June 23, 2008
Water pump seal worn
Motor Factor @ Ubi
Pump Seals $40 (3)
Oil Filter $16
Labour $70
Royal Purple X3
Water Wetter
Mileage : 116,972 km
These happend a few weeks ago and I only got it done last week.
Since the last servicing on the oil pan, I never tot I would see EO leaking at the bottom so soon. I spent the past 2 weeks trying to figure out where the leak came from. I was glad the leak didnt came from the same place as the last time.
Alex removed my left faring and cleaned the bottom before asking me to ride around without my fairing on so we could monitor the leak more conveniently. I road about 5 km, spotted a minor leak somewhere and went back to Alex, both of us didnt find the source of the leak and I had to get back to work.
The very next day I went to Bike123 to check, Kenny said he was very sure its from the Water Pump and he point to me beads of EO appearing from it. I was kinda shock when I saw it. To make sure, we cleaned it and rode with 1 side less fairing, when I returned, the EO leak appeared from directly below the water pump, problem rectified.
The very next day, went back to Factor to replace the pump seals since it was super near my work place, I could get my colleague to sent me out to collect my bike too.....
2 days later, I check for leaks again, dry as "hungry hippo"
1 less thing to worry before my Hatyai bike week.......................
Will be getting the pics up on the seals....
Pump Seals $40 (3)
Oil Filter $16
Labour $70
Royal Purple X3
Water Wetter
Mileage : 116,972 km
These happend a few weeks ago and I only got it done last week.
Since the last servicing on the oil pan, I never tot I would see EO leaking at the bottom so soon. I spent the past 2 weeks trying to figure out where the leak came from. I was glad the leak didnt came from the same place as the last time.
Alex removed my left faring and cleaned the bottom before asking me to ride around without my fairing on so we could monitor the leak more conveniently. I road about 5 km, spotted a minor leak somewhere and went back to Alex, both of us didnt find the source of the leak and I had to get back to work.
The very next day I went to Bike123 to check, Kenny said he was very sure its from the Water Pump and he point to me beads of EO appearing from it. I was kinda shock when I saw it. To make sure, we cleaned it and rode with 1 side less fairing, when I returned, the EO leak appeared from directly below the water pump, problem rectified.
The very next day, went back to Factor to replace the pump seals since it was super near my work place, I could get my colleague to sent me out to collect my bike too.....
2 days later, I check for leaks again, dry as "hungry hippo"
1 less thing to worry before my Hatyai bike week.......................
Will be getting the pics up on the seals....
Saturday, May 17, 2008
Wiring up the fan. Why the 2nd fan keep running.
I want to fix up the second fan myself but the header/extractor is blocking my clearance to mount up the fan. Since I was going to get Kenny to replace my oil pan. Might as well get him to fix up the fan.
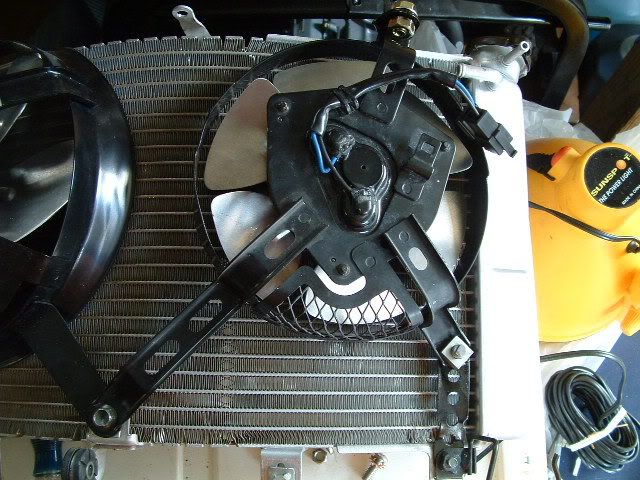
This is a pic of a suzuki 1000 k3/4 fan as 2nd fan,
taken from hayabusa.org.
The bottom left is sharing the same point with the stock fan,
The bottom right needs a bracket coz its too short,
The top is sharing with the radiator mounting point.
In general, get the wire mesh facing down.
My purpose was to have the 2nd fan dependent on the stock fan to turn on. Which means when the stock fan turns on, it will trigger the relay for 2nd fan to turn on. Kenny seems to have a problem, he told me that the stock fan has a constant 12volt supplying and he did not understand why.
Following my method will keep the 2nd fan running all the time. After half a day of attempt, he gave up and add a switch point so I could turn it off whenever I wanted to.

Circuit diagram of the fan.
Kept going over and over but nothing seems wrong.
After 1 week of monitoring my house renovation. I've finally had the time today to reroute the fan's wire. I tried my method, 2nd fan's relay dependent on the first fan's current, 2nd fan current directly from battery. However, the 2nd fan still run immediately when the relay was connected to the first fan. I can't believe that my method was wrong but I finally gave up and ask some guys for advise.
In the end the answer was, The positive wire for the stock fan was a constant supply however why it did not run was because the grounding wire was not "close". No ground = no return path = OFF mode. Why the 2nd fan was turned on was because the return path was connected to a common ground, that grounding path was "close" all the time!!

After thinking the whole thing for a while, nothing would have gone wrong if I didn't add a relay. Without the relay, I would have tap the current and grounddirectly from the stock fan.

Messy wires for the fan.
I had a 10A fuse there directly from the battery to the 2nd fan.

Top of fan sharing mounting point with radiator.

Inner mounting point sharing with stock fan.

Outer mounting point need a bracket.

Before

And after.
Tested for overheat, when both fan first trigger, heat was brought down in 10 seconds when fans stops, 2nd time, 16 seconds.
This is a pic of a suzuki 1000 k3/4 fan as 2nd fan,
taken from hayabusa.org.
The bottom left is sharing the same point with the stock fan,
The bottom right needs a bracket coz its too short,
The top is sharing with the radiator mounting point.
In general, get the wire mesh facing down.
My purpose was to have the 2nd fan dependent on the stock fan to turn on. Which means when the stock fan turns on, it will trigger the relay for 2nd fan to turn on. Kenny seems to have a problem, he told me that the stock fan has a constant 12volt supplying and he did not understand why.
Following my method will keep the 2nd fan running all the time. After half a day of attempt, he gave up and add a switch point so I could turn it off whenever I wanted to.

Circuit diagram of the fan.
Kept going over and over but nothing seems wrong.
After 1 week of monitoring my house renovation. I've finally had the time today to reroute the fan's wire. I tried my method, 2nd fan's relay dependent on the first fan's current, 2nd fan current directly from battery. However, the 2nd fan still run immediately when the relay was connected to the first fan. I can't believe that my method was wrong but I finally gave up and ask some guys for advise.
In the end the answer was, The positive wire for the stock fan was a constant supply however why it did not run was because the grounding wire was not "close". No ground = no return path = OFF mode. Why the 2nd fan was turned on was because the return path was connected to a common ground, that grounding path was "close" all the time!!
After thinking the whole thing for a while, nothing would have gone wrong if I didn't add a relay. Without the relay, I would have tap the current and grounddirectly from the stock fan.

Messy wires for the fan.
I had a 10A fuse there directly from the battery to the 2nd fan.

Top of fan sharing mounting point with radiator.

Inner mounting point sharing with stock fan.

Outer mounting point need a bracket.

Before

And after.
Tested for overheat, when both fan first trigger, heat was brought down in 10 seconds when fans stops, 2nd time, 16 seconds.
Wednesday, May 14, 2008
Replacing the Oil Pan
123 Bike Trading @ Lavender Street
Mileage: 115,000KM
Oil Pan Cover $150
Drain bolt $5 (ks)
Esso Gold Full Syn 10w40 3 X $16 (LAB, Testing to see if bolt will drip)
Gasket $10
Labour $80 (inclusive removing headers/extractor,installing fan, troubleshooting wiring, EO change, installing oil pan and gasket)
Once kenny showed me the worn out thread, the next thing was to change the oil pan loh... Ordered and left my bike there on Monday.

Removed, he one with the worn out thread.

A closer look from the inside

From the outside.

Brand new one!!! (*Upset!)
Mileage: 115,000KM
Oil Pan Cover $150
Drain bolt $5 (ks)
Esso Gold Full Syn 10w40 3 X $16 (LAB, Testing to see if bolt will drip)
Gasket $10
Labour $80 (inclusive removing headers/extractor,installing fan, troubleshooting wiring, EO change, installing oil pan and gasket)
Once kenny showed me the worn out thread, the next thing was to change the oil pan loh... Ordered and left my bike there on Monday.

Removed, he one with the worn out thread.

A closer look from the inside

From the outside.

Brand new one!!! (*Upset!)
Monday, April 28, 2008
Quick Throttle for stock busa grips
Been browsing around different forum and came upon a cheap mod on quick throttle for busa.
Busa's throttle can be replaced by another bike's throttle grip at a very low cost.
Yamaha Throttle tube with grips:
R1 : 4yr-26240-02-00 Faster Pick-up
R6 : 5SL-26240-01-00 Insane Pick-up
R6's not recommended for touring as the throttle turn is very sensitive.
Saw this video along....
Improve your track skills!
Busa's throttle can be replaced by another bike's throttle grip at a very low cost.
Yamaha Throttle tube with grips:
R1 : 4yr-26240-02-00 Faster Pick-up
R6 : 5SL-26240-01-00 Insane Pick-up
R6's not recommended for touring as the throttle turn is very sensitive.
Saw this video along....
Improve your track skills!
Saturday, April 26, 2008
Fixing the broken and Replacing the Old
Scottoiler Vacuum tube $4
Scottoiler Tube $25 ($18)
Brand new front clear signals lenses $60
Used rear clear signal lenses $10
Electric horn from before $17
Rear Cushion Lever (Dog Bone) $35 Seng kwang
Workmanship Motor Factor $30
Just last week. I notice a few time that my chain were getting dry. After checking a bit, I found the scotoiler tube torn and was leaking from the tear. It was in the right time coz I was thinking of shifting my scottoiler from under the tank to the rear. It was too hot and the oil were leaking too fast.

Just $4. Got a new set of vacuum tube so I can shift the scottoiler.

Scottoiler Tube, didn't know this could be 6 times the price of the vacuum tube.

Replacing the older model lenses
I didn't have any electrical wires at home and decided to get the horns fitted at the bike shop since I was going to do other stuff. I requested the Simon the mechanic to get the horns fitted at the sides in the "head" cowl. He seems to have some problem getting things done and took a long time to complete this job while more and more bikes came in.

Upgrading the horn system.

Its mounted just above the air intake duct, sharing meters' bracket.

While getting orange bulbs for my clear lenses. I was hunting high and low from all the bike shop for the yellow bulbs. Every bike shop had problem understanding what I was asking and what I said didnt seems to match the item I was holding.
I only realise when I called Maverick for advise. He told me my signals were not using original socket.Then, I remember when I first got my busa, the signals were different from others, it was always on until I disabled it......... now I got some plans for the signals.....
Mr Simon was alone today, Alex was in M'ysia. He had a hard time coz he had to servicing 4-6 bikes. I didnt want him to rush my stuff so I decided to let him do the rest of the stuff another time. I want to reroute some wires after noticing my front signal sockets were a different from the normal ones, so I told Simon that I will do the "Dog Bone" next time and he can use the time to reroute wires for me, but he request to do it everything other thing the next time. Ok loh........

Stock Dog bone

Custom made Dog Bone almost 1 inch shorter.
These will be fitted next time.

Throttle body butterfly valves.
Got them cleaned at the openings.
Full of carbons...
I've also notice during the servicing, many people I know came. There were Raymond & Kris, Weiz, Freddy, Maverick and Joey. Raymond were suppose to meet me here to do servicing with me. The rest kaypo maybe? hehehhe.
After fitting the horn, I waited for Raymond 's bike, he want his dog bone fit. I took the time to remove my airbox so I could change the vacuum tube. After that we all left and I went home to continue doing stuff on my bike.
While riding home, I've notice a wire dangling beside the right fork. It was the horn's wire. I came home not very satisfy with it. Decided to get it fixed and get the scottoiler fit.

New Signal Lenses, K3 or K7?

Another pic of the horn and relay fitted in the cowling.

Did some tracing and rerouting of wires and solve then horn's dangling wire problem.
Simon gave me a bundle of wires so I could reroute myself.
Finally, the last and most dirty part, refitting back the scottoiler. I could roughly guess what happen the last time when the cable was torn. Some rock must have hit it, or chaffing took place along with the bike's vibration. So what I did was to add a protection layer.

Protection layer for the scottoiler tube.

This is where I shifted the scottoiler to. Not under the tank where temperature was extremely hot and not under the seat where precious space will be wasted. In the rear cowl!!
Actually, since the first time I fit scotty, I had always been eyeing this place for scotty, also dunno why that time didnt put scotty there.
There might be some problem topping up the oil, but there will be months later.........
Scottoiler Tube $25 ($18)
Brand new front clear signals lenses $60
Used rear clear signal lenses $10
Electric horn from before $17
Rear Cushion Lever (Dog Bone) $35 Seng kwang
Workmanship Motor Factor $30
Just last week. I notice a few time that my chain were getting dry. After checking a bit, I found the scotoiler tube torn and was leaking from the tear. It was in the right time coz I was thinking of shifting my scottoiler from under the tank to the rear. It was too hot and the oil were leaking too fast.

Just $4. Got a new set of vacuum tube so I can shift the scottoiler.

Scottoiler Tube, didn't know this could be 6 times the price of the vacuum tube.

Replacing the older model lenses
I didn't have any electrical wires at home and decided to get the horns fitted at the bike shop since I was going to do other stuff. I requested the Simon the mechanic to get the horns fitted at the sides in the "head" cowl. He seems to have some problem getting things done and took a long time to complete this job while more and more bikes came in.

Upgrading the horn system.

Its mounted just above the air intake duct, sharing meters' bracket.

While getting orange bulbs for my clear lenses. I was hunting high and low from all the bike shop for the yellow bulbs. Every bike shop had problem understanding what I was asking and what I said didnt seems to match the item I was holding.
I only realise when I called Maverick for advise. He told me my signals were not using original socket.Then, I remember when I first got my busa, the signals were different from others, it was always on until I disabled it......... now I got some plans for the signals.....
Mr Simon was alone today, Alex was in M'ysia. He had a hard time coz he had to servicing 4-6 bikes. I didnt want him to rush my stuff so I decided to let him do the rest of the stuff another time. I want to reroute some wires after noticing my front signal sockets were a different from the normal ones, so I told Simon that I will do the "Dog Bone" next time and he can use the time to reroute wires for me, but he request to do it everything other thing the next time. Ok loh........

Stock Dog bone

Custom made Dog Bone almost 1 inch shorter.
These will be fitted next time.

Throttle body butterfly valves.
Got them cleaned at the openings.
Full of carbons...
I've also notice during the servicing, many people I know came. There were Raymond & Kris, Weiz, Freddy, Maverick and Joey. Raymond were suppose to meet me here to do servicing with me. The rest kaypo maybe? hehehhe.
After fitting the horn, I waited for Raymond 's bike, he want his dog bone fit. I took the time to remove my airbox so I could change the vacuum tube. After that we all left and I went home to continue doing stuff on my bike.
While riding home, I've notice a wire dangling beside the right fork. It was the horn's wire. I came home not very satisfy with it. Decided to get it fixed and get the scottoiler fit.

New Signal Lenses, K3 or K7?

Another pic of the horn and relay fitted in the cowling.

Did some tracing and rerouting of wires and solve then horn's dangling wire problem.
Simon gave me a bundle of wires so I could reroute myself.
Finally, the last and most dirty part, refitting back the scottoiler. I could roughly guess what happen the last time when the cable was torn. Some rock must have hit it, or chaffing took place along with the bike's vibration. So what I did was to add a protection layer.

Protection layer for the scottoiler tube.

This is where I shifted the scottoiler to. Not under the tank where temperature was extremely hot and not under the seat where precious space will be wasted. In the rear cowl!!
Actually, since the first time I fit scotty, I had always been eyeing this place for scotty, also dunno why that time didnt put scotty there.
There might be some problem topping up the oil, but there will be months later.........
Friday, April 25, 2008
EO change, trying out Royal Purple
Royal Purple x 3 $17.50 each
Mileage : 114,256k Mileage
It just click pass 5000k and being to Thailand once. I guess its time to change EO.
Will be trying out this Royal Purple. Many good comments on it and trying it out.
Mileage : 114,256k Mileage
It just click pass 5000k and being to Thailand once. I guess its time to change EO.
Will be trying out this Royal Purple. Many good comments on it and trying it out.
Monday, April 21, 2008
Getting some stuff over the weekend
Meet quite a number of people over the weekend to gather some stuff for my bike.
Meet Raymond & Kris, Maverick, Mark, Alan & Carine, Mark & Vanessa, NewOldGuy, Solowing, Freddy, Avril, Damian & Sarah, Johnny, Rachael and Kenny the Mechanic.
Bike's EO was going to due for another change, got my self new oils before I really need them. Been hearing good and bad review on this "Royal Purple". Decide to try them out for next change to see for myself.

$17.50 each.

These intake mesh were dislodge while removing head cowl for spraying, forgot to glue them back and they kept coming off, after so long, removed, resprayed them and await to be fitted.

Scottoiler Vacuum hose, going to replace them.

Electrical horns, these were a must get for touring.
Stock horns sounds sissy at high speed.

Got myself some clear rear indicator/signal lense.
Awaiting for front's to arrive.

Rear set adapter/Kick plates. Move stock rearsets approx. 1.65" back and 1.5" up.
Made with 6061 aluminum. $60 for a set. Limited
Maverick was asking if I want a set of these and told me to try his bike on the spot.
Try the new dimension and felt it gave me the angel I wanted where everytime I corner.
Bought on the spot.

Stock, without adapters

With adapters

Stock, without adapters

With adapters and extension gear rod.

Its been a long time since Jean followed me into Mysia for pump.
She really enjoy herself.
Meet Raymond & Kris, Maverick, Mark, Alan & Carine, Mark & Vanessa, NewOldGuy, Solowing, Freddy, Avril, Damian & Sarah, Johnny, Rachael and Kenny the Mechanic.
Bike's EO was going to due for another change, got my self new oils before I really need them. Been hearing good and bad review on this "Royal Purple". Decide to try them out for next change to see for myself.

$17.50 each.

These intake mesh were dislodge while removing head cowl for spraying, forgot to glue them back and they kept coming off, after so long, removed, resprayed them and await to be fitted.

Scottoiler Vacuum hose, going to replace them.

Electrical horns, these were a must get for touring.
Stock horns sounds sissy at high speed.

Got myself some clear rear indicator/signal lense.
Awaiting for front's to arrive.

Rear set adapter/Kick plates. Move stock rearsets approx. 1.65" back and 1.5" up.
Made with 6061 aluminum. $60 for a set. Limited
Maverick was asking if I want a set of these and told me to try his bike on the spot.
Try the new dimension and felt it gave me the angel I wanted where everytime I corner.
Bought on the spot.

Stock, without adapters

With adapters

Stock, without adapters

With adapters and extension gear rod.

Its been a long time since Jean followed me into Mysia for pump.
She really enjoy herself.
Friday, April 11, 2008
Rear Brake Rotor replacement
It was raining Cats & Dogs in the morning when I was suppose to replace my rear rotor. The idea was to replace as early as possible and come home to take plenty of rest!
So wait wait wait... and wait wait and wait and wait and wait...... but rain didnt stop, until finally it became a drizzle. went down to factor around 11am and finally had it replaced.

Worn-out disc brake

Nicely fit and ready to roll!!
With new disc brake in place, braking still not very effective, shall hold lightly on the lever till the pads are fully bedded in and disc had roughen out....
So wait wait wait... and wait wait and wait and wait and wait...... but rain didnt stop, until finally it became a drizzle. went down to factor around 11am and finally had it replaced.

Worn-out disc brake

Nicely fit and ready to roll!!
With new disc brake in place, braking still not very effective, shall hold lightly on the lever till the pads are fully bedded in and disc had roughen out....
Thursday, April 10, 2008
Chain replacement for Thailand trip.
DID X-Ring 50VM(530VM) 120ZB approx $170
Front Sprocket approx $80
Mileage approx : 111,770km
About a month ago, While cleaning my chain, I notice some *tok *tok sound while rotating the rear wheel slowly. Was it time for my chain or sprocket to go? My drive chain had been running in all sort of condition, hard, fast, gently, slow, sudden, wet, dry, sandy, clean, etc et.... The chain clocked approx. 40,000 KM. I guess its really time to replace them.

D.I.D, My prefered brand.
X-Ring, My prefered choice.

New set of Chain & Sprocket
It was for the best coz I'm going up thailand on friday and cannot affort to have a chain snap(unlikely but super dangerous). I need to travel with a safe and peace mind and to come home to see my worried wife

This is 1 Area I always wanted to open up for cleaning.

Tools that are required to open up the sprocket cover and remove the sprocket.
Not forgetting a Jack.
Order from Motor Factor the same set of chain as my current, and a stock front sprocket. Told them to alter to the shortest my wheel could hold. Was comparing my old and new sprocket because it ran almost half the mileage of the drive chain. It did wear enough for me to decide a change.

Comparing the Old and New Sprocket, the (teeth) are
slightly tilted and sharper, a sign of wear.

Old Chain

New Drive Chain, the *tok sound went away.
Front Sprocket approx $80
Mileage approx : 111,770km
About a month ago, While cleaning my chain, I notice some *tok *tok sound while rotating the rear wheel slowly. Was it time for my chain or sprocket to go? My drive chain had been running in all sort of condition, hard, fast, gently, slow, sudden, wet, dry, sandy, clean, etc et.... The chain clocked approx. 40,000 KM. I guess its really time to replace them.

D.I.D, My prefered brand.
X-Ring, My prefered choice.

New set of Chain & Sprocket
It was for the best coz I'm going up thailand on friday and cannot affort to have a chain snap(unlikely but super dangerous). I need to travel with a safe and peace mind and to come home to see my worried wife

This is 1 Area I always wanted to open up for cleaning.

Tools that are required to open up the sprocket cover and remove the sprocket.
Not forgetting a Jack.
Order from Motor Factor the same set of chain as my current, and a stock front sprocket. Told them to alter to the shortest my wheel could hold. Was comparing my old and new sprocket because it ran almost half the mileage of the drive chain. It did wear enough for me to decide a change.

Comparing the Old and New Sprocket, the (teeth) are
slightly tilted and sharper, a sign of wear.

Old Chain

New Drive Chain, the *tok sound went away.
Subscribe to:
Posts (Atom)